Data mapping ensures your leave records are correctly interpreted by Appsentia. This guide explains how to map your existing data structure to our system for accurate analysis.
Understanding Data Mapping
What is data mapping? It's the process of telling Appsentia which columns in your file correspond to which fields in our system.
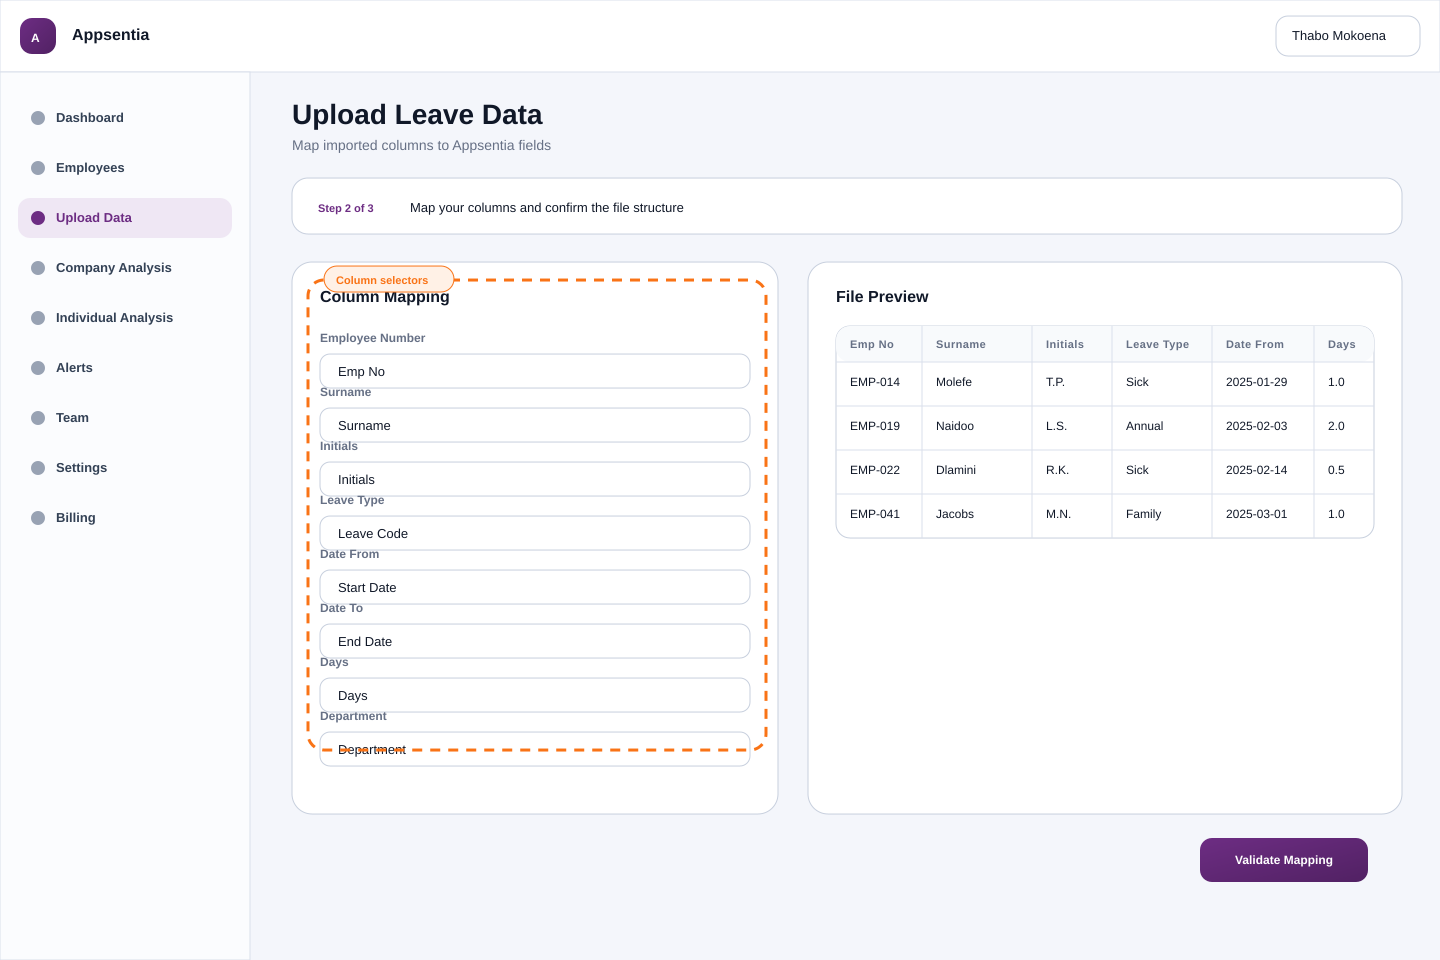
For example, your file might have a column called "Emp No" which needs to be mapped to our "Employee Number" field. The mapping interface makes this visual and straightforward.
Preparing Your File for Upload
Supported File Formats
- Excel: .xlsx, .xls
- CSV: .csv (comma-separated values)
- Maximum file size: 10MB
- Maximum 50,000 rows per upload
Pre-Upload Checklist
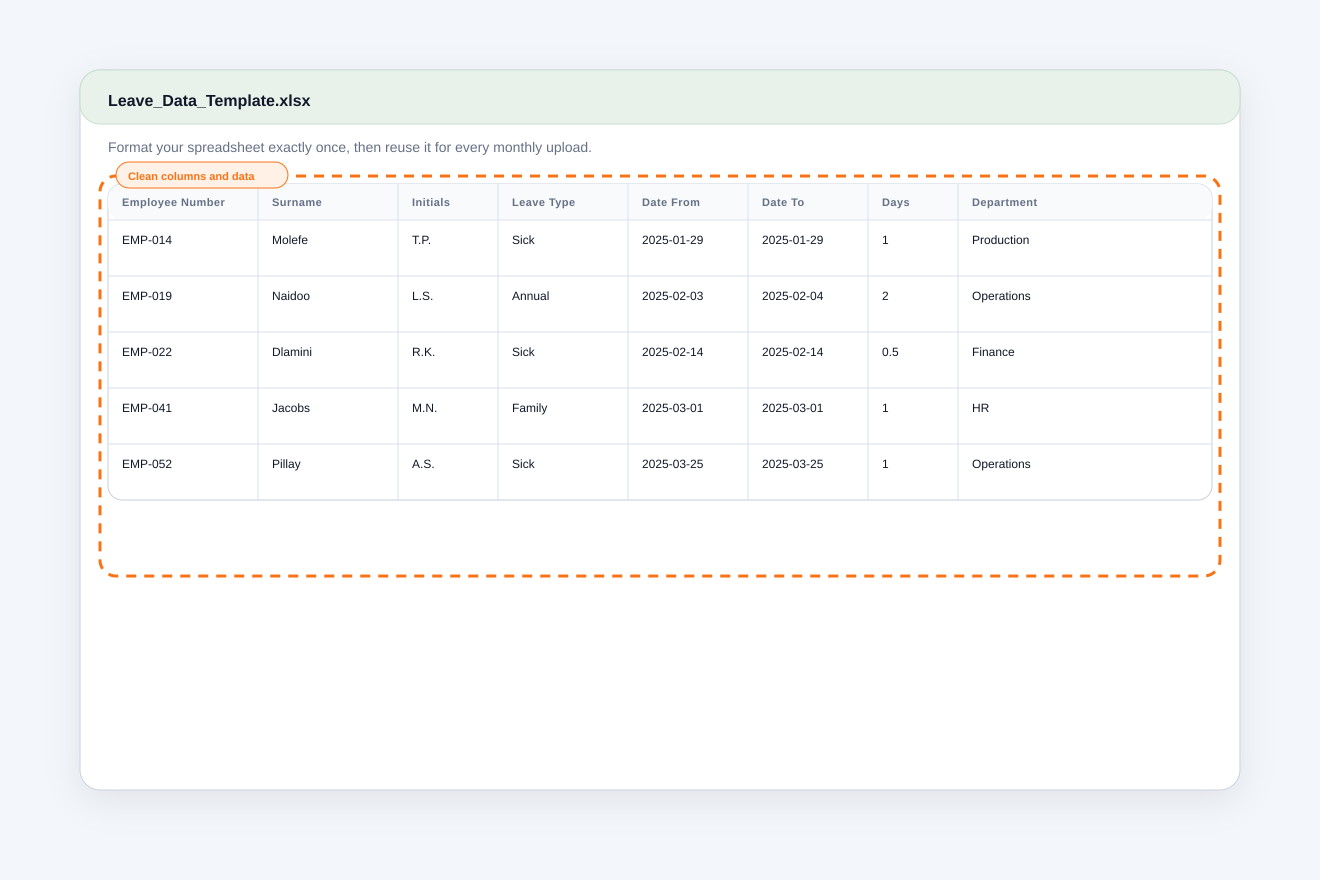
Column headers in first row: Ensure the first row contains clear column names
Remove blank rows: Delete empty rows between headers and data
Consistent date format: All dates use the same format (YYYY-MM-DD preferred)
Numerical days column: Days should be numbers (3, 0.5, 1.5), not text
No merged cells: Unmerge any merged cells in Excel
The Mapping Process: Step by Step
Upload Your File
Navigate to Data Upload and click "Upload New Data". Select your file or drag-and-drop it into the upload area.
Review Auto-Detection
Appsentia automatically attempts to map your columns based on:
- Column header names (e.g., "Emp No" → Employee Number)
- Your previous mapping history
- Common payroll export formats
Check each mapping dropdown carefully—auto-detection is accurate about 80% of the time.
Map Required Fields
These fields MUST be mapped for upload to proceed:
| Appsentia Field | Common Column Names | Example Values |
|---|---|---|
| Employee Number | Emp No, Employee #, Staff ID | EMP001, 12345 |
| Surname | Last Name, Surname, Family Name | Naidoo, Van Der Merwe |
| Initials | Initials, First Initial, Given Names | S.K., J.P. |
| Leave Type | Type, Leave Type, Absence Type | Sick, Annual, Family |
| Date From | Start Date, Date From, Commence | 2024-01-15 |
| Date To | End Date, Date To, Finish | 2024-01-17 |
| Days | Days, Duration, Total Days | 3, 0.5, 1.5 |
Map Optional Fields
Department (recommended but optional):
- Enables department-level analytics
- Can be blank if not available
- Will be matched to employee records if already set
Ignore Unused Columns
If your file has columns you don't need (e.g., "Manager", "Salary Grade"), select "Ignore" from the dropdown. These columns won't be imported.
Select Date Format
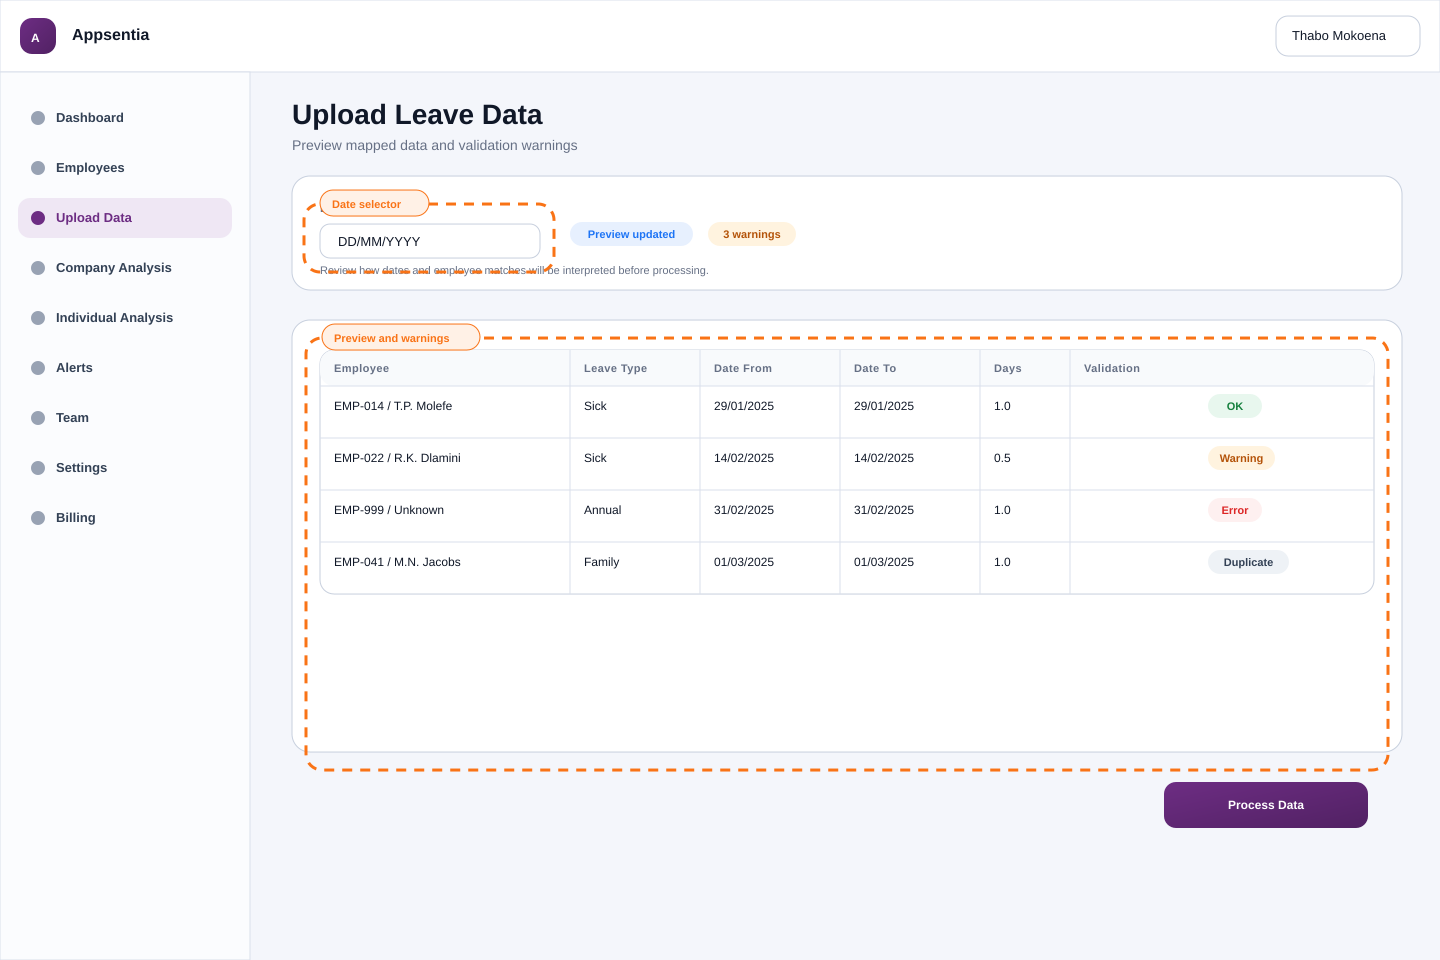
Tell Appsentia how to interpret your dates:
- YYYY-MM-DD: 2024-01-15 (international standard)
- DD/MM/YYYY: 15/01/2024 (South African format)
- MM/DD/YYYY: 01/15/2024 (US format)
Review Data Preview
Scroll through the preview table showing how Appsentia will import your data:
- ✓ Verify employee numbers match your records
- ✓ Check dates appear correct (day/month not swapped)
- ✓ Ensure leave types are recognized
- ⚠️ Review any warning indicators
Process the Upload
Once satisfied with the mapping, click "Process Data". The system will:
- Validate each employee exists in your system
- Check for duplicate transactions
- Normalize leave type naming
- Calculate business days and flag patterns
- Insert validated records into the database
Leave Type Normalization
Appsentia automatically standardizes leave type names to ensure consistent reporting:
Sick Leave
Normalized to: "Sick"
Recognizes: Sick Leave, Sick, Medical, Illness, S/L
Annual Leave
Normalized to: "Annual"
Recognizes: Annual Leave, Annual, Vacation, Holiday, A/L
Family Responsibility
Normalized to: "Family"
Recognizes: Family Responsibility, Family, F/R, FR Leave
Handling Upload Errors
Common Error Messages
❌ "Employee not found: EMP123"
Cause: Employee number doesn't exist in your employee list.
Fix: Add the employee first, or check for typos in the employee number.
❌ "Invalid date: Row 45"
Cause: Date cannot be parsed or is in wrong format.
Fix: Ensure dates are actual date values (not text) and match selected format.
❌ "Date 'To' before Date 'From'"
Cause: End date is before start date.
Fix: Check for date format issues or swapped column mapping.
⚠️ "Duplicate transaction: Row 120"
Not an error: This record already exists in the system and was automatically skipped to prevent duplication.
Using the Error Report
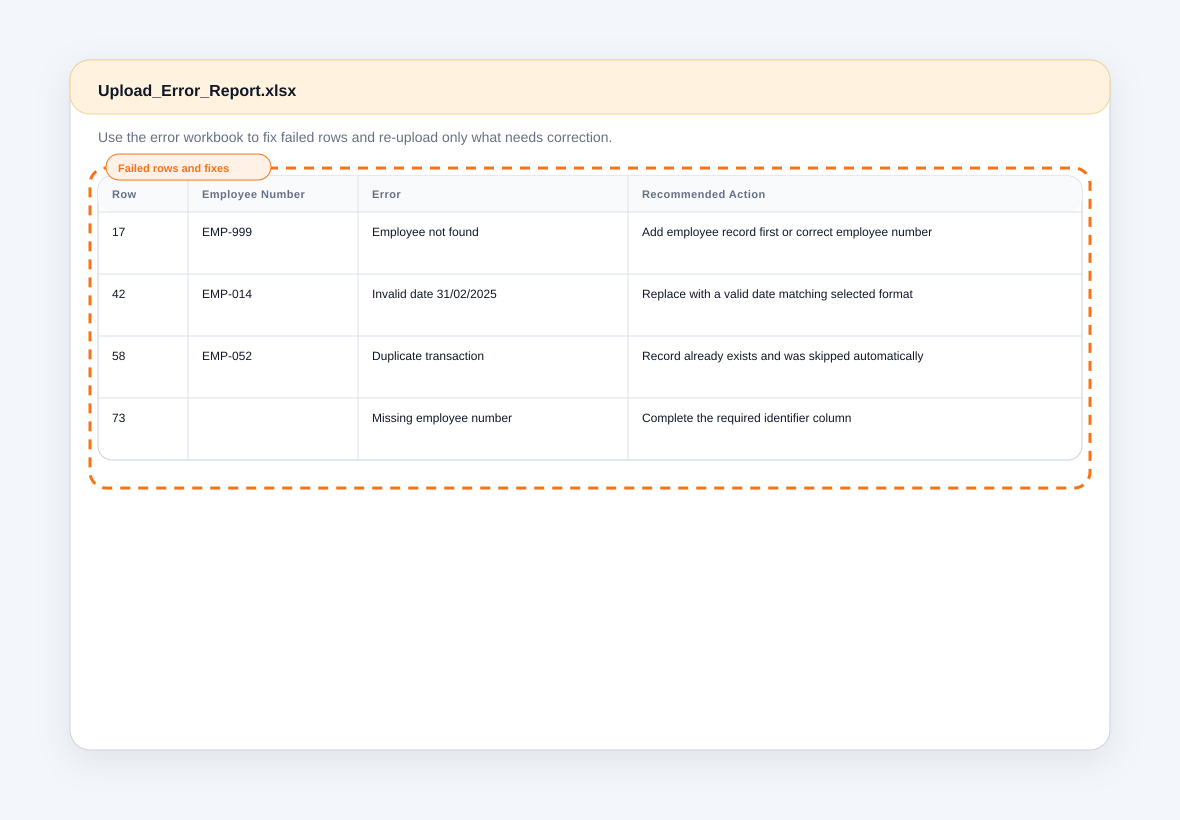
If your upload has errors, download the error report (Excel file) which includes:
- Row number from your original file
- Employee number and details
- Specific error message
- Recommended action
Fix the errors in your original file and re-upload. Successfully processed records won't be duplicated.
Advanced Mapping Scenarios
Scenario 1: Split Name Columns
Your file has "First Name" and "Last Name" as separate columns:
- Map "Last Name" → Surname
- Map "First Name" → Initials (system will extract initials automatically)
Scenario 2: Combined Date Column
Your file has single-day absences with only one date column:
- Map that column to both "Date From" AND "Date To"
- Set "Days" to 1 if not in your file
Scenario 3: Different Employee Identifiers
Your export uses ID numbers instead of employee numbers:
- Before uploading leave data, update employee records to include these IDs in the "Employee Number" field
- Or, manually edit your leave file to replace IDs with employee numbers
Saving & Reusing Mappings
Appsentia automatically saves your column mapping configuration for future uploads:
- Same file structure: Next upload auto-maps all columns instantly
- Changed structure: Easily adjust mappings as needed
- Multiple sources: Each unique file structure is remembered separately
Best Practices Checklist
- ✓ Always download the Excel template for first-time uploads
- ✓ Use consistent file formats month-to-month to leverage saved mappings
- ✓ Review the data preview carefully before clicking "Process"
- ✓ Test with a small sample file (10-20 rows) first to verify mapping
- ✓ Keep original files as backups in case you need to re-upload
- ✓ Download and review error reports immediately
- ✓ Choose date format carefully—preview dates to confirm correctness
- ✓ Include department data if available for richer analytics